Off Grid...Chapter 104
Mike has a new saying for our "Off Grid Home" It is now our ongoing living laboratory where we will and have tried, lol, many different things in search of the perfect outcome. This is where we all get to learn and if one thing doesn't work out then we will try something else. We are now hoping to improve upon our home...so that means there will be some re-do's
 I hate re do's...but if it will make our living better than we will do it. I hate re do's...but if it will make our living better than we will do it.Our Awning Story....I hope you enjoy  As you know we have no A/C inside the house, and since we placed our house to get the best view, we get the direct sunlight in the late afternoon. We have been able to stay cool by closing the blinds in the late afternoon but then we loose the enjoyment we get from looking outside. Mike and I decided to build a covered awning which will block the sun and also give us some cover for sitting outside while it rains  I can't wait to get some comfy lounge chairs and kick back this year I can't wait to get some comfy lounge chairs and kick back this year It took us a few trips to town to get enough lumber to start the job. Now we are ready to work. Mike starts off by taking down the old trim.  Then we have to install the ledger board along the entire front of the house to hold the frame and the panels. Mike puts on a double sided caulking strip for added leak protection for the ledger board. 
Next he pre drills holes in the board so we don't split the wood when we put the bolts in.
 Using a hammer to start the anchor bolt.  And then the ratchet to screw the bolt in.  Once the ledger board is attached to the house we have to install the front posts. We are installing four 4x4 front posts to hole up the cross beams and the panels. Mike and I used metal post anchors to install the posts. We had to drill each anchor into the concrete patio and the screw the post into the anchor. They are installed.  Next we have to put a header board across the 4 posts so we have something to screw the beams to. We used lag bolts to do this.  It doesn't look like much yet but we are getting there Now it's time for the rafters. We are going to install one rafter every 3 feet and then we will add alternating rafters 3 feet long in the opposite direction to support the top panels. Mike screwing in the last of the long rafters.  Working on the cross sections.  The base frame is up now it's time to paint. Mike and I painted 2 coats ...while the princess gets to enjoy our hard work   We called around for pricing on translucent panels for the roof. David at the farm supply had the best deal. Mike and I took the trailer to the farm supply and picked up our panels. Each panel is 3 feet by 12 feet. That will be our cover. Mike starting to install the panels.  Finally, we are up to the last section..and it's a tight fit. Good thing we did this last year. Right now I don't think either one of us cold fit in there   We are done with the awning. We may look into some roll down shades for the front. Awning from the front.  From the side.  From above.  Our next project is to protect the hill by our ditch that the cows keep messing with. This time Mike and I are installing poles with electric wire to protect the bank. Putting in the poles.  Then we added more grass seed, and stapled another layer of curlex down. Hopefully we can get the bank to hold this time  Here are some clouds rolling in.  Mike and I took a ride across the way and I tried to take a picture of our little homestead. It was a cloudy day but this is what we look like.  And finally...the very last job that was done last year. We had one more section of paving done. I wasn't there the whole time but I did get some pictures for you. The asphalt truck.  Brushing on the adhesive for the curbing.  And making the curbs.  We now have the paving down 2/3's for the driveway. We may finish the last of it this summer. It is so much nicer to drive on the pavement and it doesn't wash out and tear up our car like the gravel does. One more picture before I finish. I found a strange bug in my garden. I posted this last year and someone did tell me what it was but for the life of me I can't remember  I will have to look it up for you. Anyway here is the strange but cool looking bug. I will have to look it up for you. Anyway here is the strange but cool looking bug.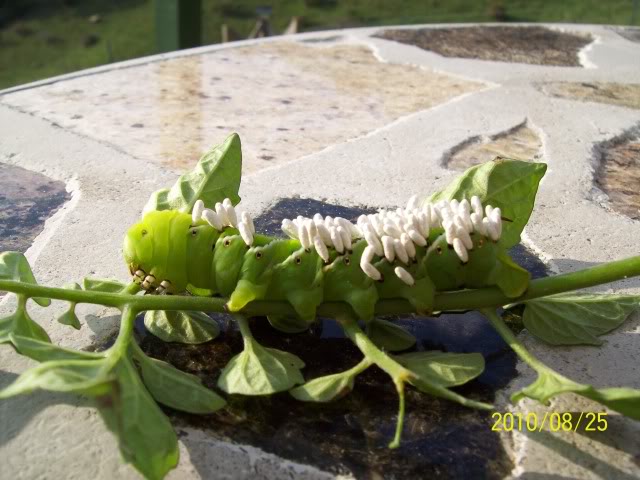 I got it. It is a tomato hornworm with wasp eggs. "Tomato hornworm larvae are also parasitized by a number of insects. One of the most common is a small braconid wasp, Cotesia congregatus. Larvae that hatch from wasp eggs laid on the hornworm feed on the inside of the hornworm until the wasp is ready to pupate. The cocoons appear as white projections protruding from the hornworms body (see photo, left). If such projections are observed, the hornworms should be left in the garden to conserve the beneficial parasitoids. The wasps will kill the hornworms when they emerge from the cocoons and will seek out other hornworms to parasitize." I hope you all enjoyed it. Next week I will tell you about Mike and I installing our wood stove Lisa |
Monday, February 25, 2013
Chapter 104...How To Build An Awning & More Asphalt Curbing
Subscribe to:
Post Comments (Atom)
Love the covered patio! Does the translucent roofing give enough protection from the sun that it is helping in the house?
ReplyDeleteIt does. We did have to add a roll down blind for sitting on the patio in the afternoon sun.
Delete