Hello. My husband Mike and I love real estate. We like to remodel houses, build houses, and also redo land. This story is about the remodel that we did a couple of years back. I wish I had done stories of all of our house flips but sadly I did not take pictures of our other remodels.
So lets talk about this house. My husband, Mike, and I were on our mountain top in TN when I was checking the real estate in FL in the neighborhood that we like to buy. I saw a house come up that was on a street that we have been trying to get on for years. I got very excited and told my husband about it. We called our realtor in FL and found out there were other offers on the house. My DH and I don't like to take part in bidding wars but we had a number in our head that we would be willing to go up to. We started the back and forth bidding process without ever seeing the home. We knew this was a great location house. The funny thing was...our Realtor was in CT at the time we made our offer and we were in TN. Nothing like getting the job done We ended up closing on the house in the Spring of 2009. We had no plans of going down to FL until the Fall of 2009 and we had to work on another house first. So this house would have to wait.
Here is the house we bought site unseen. We did check Google maps to see what the other houses on the block looked like and also the location of it.
Here is what we bought:
The front:

The garage:

Looking through the front door:

The back side of the kitchen:

The kitchen:

The back Lanai:

The outside of the lanai screen room:

And the real reason we wanted this house on this block....the back canal:

and:

We knew it had to be pretty bad since there were no other inside pictures
This house was built in the 70's. It is a 3 bedroom 2 bath home. Everything in the house is original. The only good thing about it was the newer roof...other than it being orange It has an incredible location with lots of potential. As my story unfolds I will show you the work that was done.
I hope you all enjoy this story.
Lisa


Outside Cleanup and Starting on the Inside
Good morning. Since I had so many good responses I decided to post another story to whet your appetite for more .
.
.
My husband, Mike and I went down to Florida to work on our other house in October of 2009. We had no plans of working on this house at all until we finished the first house....but of course plans change
Our tree guys finished up at the first house and while we had them working we decided to let them start on this house. He went over before us to start cutting.
This is what Mike and I saw when we got to the house. The overgrowth.

and

One of the things Mike and I hate most about a lot of the homes we do is the total lack of maintenance on the landscaping. These houses are just too small to have jungles in the front and back yards. We always have the trees and overgrowth cleared away when they are too close to the house.
Our tree man cutting and clearing:


Almost done in the back.

And the pretty pineapple palm the way it should be.

While the guys were outside Mike and I went inside. We don't have time to work on this right now but of course Mike just "has" to do something, lol.
The master bedroom...Eww!!!! and somebody lived here.

Mike starting to tear up the carpet....which has to go before we can move over to this house when the first one is finished.

The tree guys finished and that's all we had time for. We told the workers they could take "anything" out of the house they wanted except for the refrigerator. The only thing he wanted was the laminate flooring that was in the living area. That was one less job for Mike and I
We didn't make it back to the house until November 30, 2009. The men showed up to do the curbing at our other house and then came here to do the curbing here. There are a few very important things that Mike and I do when we remodel. 1. We fix anything that is broken and can't be used. 2. We make sure the place is clean and move in ready. 3. We get rid of all the junk.
On the outside of the house we always have curbs done along the entire perimeter of the house. Then we fill those curbs with rock and eventually some plants. The whole idea behind this is to keep things as maintenance free as possible. The curbing and the rocks keep the dirt away from the house...therefore keeping possible termites away. Dirt at the bottom of your house and sitting water is never a good thing. It also helps when you mow and weed eat. Your house paint can never get dirty or chipped away.
.
So here are the steps for something I think is pretty cool.
First the curbing guys have to cut out where the curbing will be poured.

On the truck they have to mix the concrete and then pour it into wheel barrels.

Next one of the guys will bring the wheel barrel over to the curbing location. Once there, they shovel the concrete into the hopper of the machine. Then it shoots out in the form of a curb. So cool

Once the machine is empty, the men smooth out the curbs and put expansion joints in. This will keep it from cracking.

Smoothing it out by hand.

And the curbing around the pineapple palm.

While the curbing is being done we brought a couple of our other contractors inside to see if they wanted anything.
They started in the kitchen while I got my first real pictures of the inside of the house.
This is the spare bathroom.

and

The front small bedroom.

And the back bedroom.

It looks like these carpets haven't been cleaned in decades. I feel bad because it was an old man who lived here and I guess no one cared about him enough to help.
There was also some water spots on the ceiling which is the reason why the roof was replaced.
Back to the kitchen.
Mike and ones of the guys taking out the dishwasher.

While they did that, I started to tear up the green indoor outdoor carpet on the back patio.

Taking out the kitchen sink.

I took up the last of the laminate flooring.

While the guys took the things they wanted, I went to take some more pictures.
The master bath.


and

As much as we would like to dig in and do demo, we just don't have the time right now. Although Mike couldn't resist starting on there kitchen cabinets

The cabinets in the kitchen could not be salvaged. Things were just too rotted away so we will tear it all out and start fresh. Oh yeah...we will also be moving the kitchen
. Oh yeah...we will also be moving the kitchen
That is all of the pictures for today. My next story will be about some real work and some real demo.....our favorite


Water Heaters and Demo
Good morning. It's time for another chapter in our story. I am trying not to overload everyone with pictures so I am taking it slow.
At the time of todays story we were still working on the other house so we haven't gone full blown crazy yet
Lets go back to December 8. Mike and I are almost done with the other house. We have a few more weeks before the carpet goes in there and then we need to move over here. So first things first. The water heater in this house is no good...so we need to replace it. Mike does such a nice job of this
He starts out by disconnecting the old water heater.

Using the cut off wheel to cut the old water pipes.

After that we took the old water heater out and I cleaned up the floor and the walls. Then we put the new pan in and the new water heater in the pan.
Mike putting the thread tape on to protect the new water lines from dripping.

Adding the new flexible water lines. The flexible lines make it so easy.
.
Mike hooking up the electric and he is done The new water heater is in.
The new water heater is in.
We should really get back to the other house to work but we just can't resist a little demo work . We have big plans for this house because of it's location. The biggest thing we want to do is make sure you see the water view when you open the from door. That means we have to take down walls and move rooms.
. We have big plans for this house because of it's location. The biggest thing we want to do is make sure you see the water view when you open the from door. That means we have to take down walls and move rooms.
This is the floor plan for the house when we bought it. This is not to scale but it will show you what it was like.
but it will show you what it was like.
The whole kitchen needs to go Some of our contractors have taken the stuff they wanted. Mike and I already took the cabinet doors off the cabinets in the kitchen. Time to tear out a kitchen
Some of our contractors have taken the stuff they wanted. Mike and I already took the cabinet doors off the cabinets in the kitchen. Time to tear out a kitchen
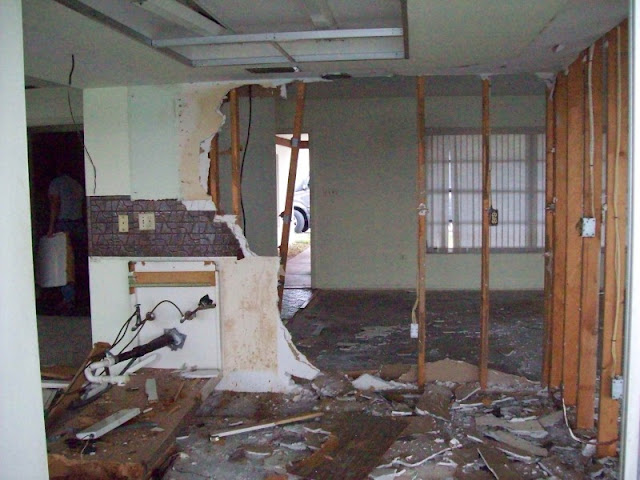
The view from the front door....those walls have to go.

The dining area that also has to go.

Oh yeah..and the den which has to go

Mike and his trusty ax....I always call it the sledgehammer Say good bye to the old rotted cabinets
Say good bye to the old rotted cabinets
While Mike goes crazy with the sledgehammer I clean up behind him. Yeah...that seems to be the story of my life, lol. He gets to have all the fun while I clean it up
We get all of the cabinets out and thrown into our garbage pile in the garage. Time to bust out some walls
Mike starting on the first kitchen wall.

And he is through.

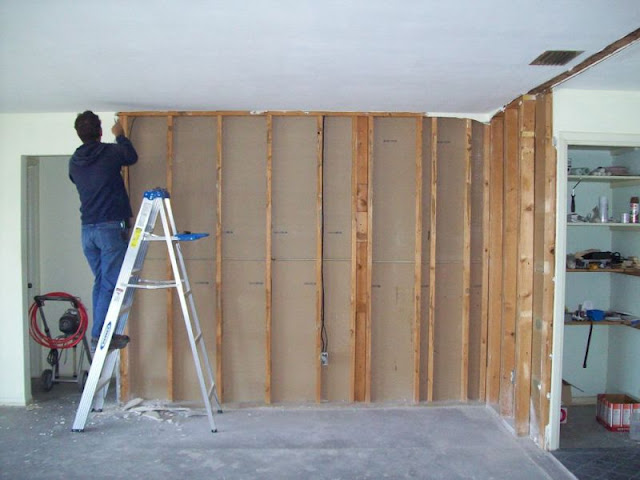
Now we can work on the other side and tear off the sheet rock.

Time for the back wall of the kitchen.

Just breaking through.

The sheetrock is coming down.

Ooh....look...I see a view from the front door
from the front door
That's two walls almost down. Time for the last wall in the kitchen.

Almost clear

And that's how fast we can make a mess

Me cleaning up.

While Mike was busy at one point I went around to see what I could do.
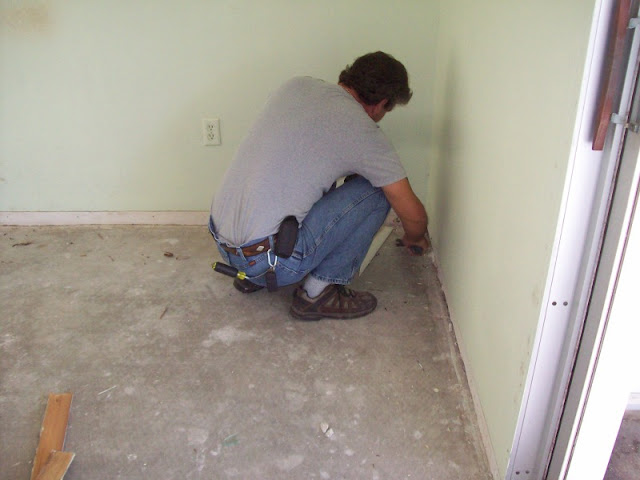
This is the master bedroom. We have already gotten the carpet out and we will need to prep it very soon to move into. Here I am using a shovel, hey we don't have our tools here yet lol, to get the tack strip off the floor.

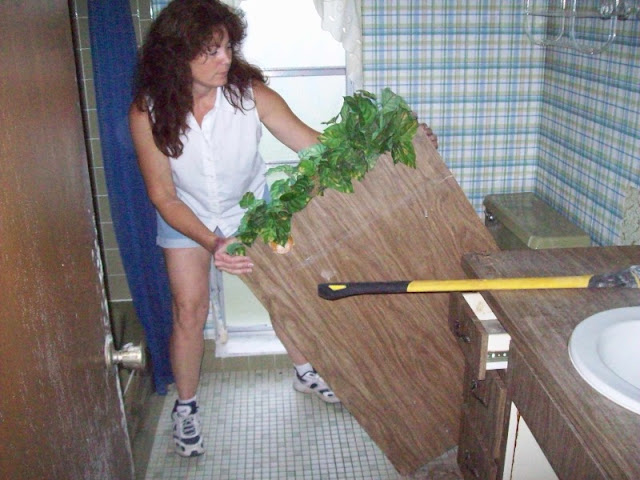
And the next day....I pulled the "planter" out of the bathroom.
out of the bathroom.
Next week's story will be about us getting ready to move over to this house and doing some more work. I hope you all enjoyed this story. Have a wonderful week.
Lisa


More Demo and Moving In
Hello everyone. It's time for another segment for our story.
So far we have gotten the kitchen walls out. We have two more walls to go and then we should be wide open
12-15
We have scheduled the carpet installation at the other flip which means we have to get this house ready for us to move into while we work on it.
We will use the master bedroom for our "living" and we will set up a table for kitchen work next to the refrigerator that we saved.
Mike is in the master bedroom taking out the baseboards.

The baseboards are out.

While Mike works on that I get the closet ready by painting it. There are a lot of nooks and crannies in closets...ugh!!! They are not my favorite thing to paint

Next we sweep down the ceiling, the walls and the bedroom floor. Now it's time to paint. Mike rolls the ceiling. After he does that I start to cut in the corners on the ceiling and the walls.
My cut in.

Mike rolling the walls.

Now we have to wait for the paint to dry. On to more demo in the main area
Mike tearing up the front wall.

It's starting to disappear.
.
That was all we did that day. We had to get back to the other house.
A new day!!
12-16
We bought some floor paint for the master bedroom. It was just too gross to move into so we decided to make it fresh.
I did the cut in which is my job while Mike rolled the floor paint on. What a team we are

After we cleaned up the brushes and the rollers we got back to the main section.
The walls are gone except for the studs.

Now it's time to take the soffit down. Most of the houses in this neighborhood were built in the 70's. Most of them had and still have soffits in the bathrooms and the kitchens. Mike and I think they make the homes look old so we take them out.
Time for the kitchen soffit to come down. Mike uses the reciprocating saw and the ax to start the process.
Mike starting on the soffit.

Ooh.....it's coming down.

And it is down.

Time for me to clean up the mess.

Mike sweeping up the final debris. Wow what a day!!!

We moved out of the other house and now we are setting up to stay here.
Mike puts the plantation doors back on the windows in the master bedroom. That is the one room where we can keep the window coverings

Niki, our pug, has a new home in the hall closet. This poor dog has moved more times than most people. She is good with it as long as she has her bed

My temporary kitchen which is so much better than the last house

Our living quarters in the bedroom.

and

We are moved in but we still have the bathroom to do at the other house. We are almost done with that house
Finally we have filled the garage so it's time to call our dumpster company. They give us a discount if we fill it the same day they drop it off. Sounds good to me.
The garage is full.

The dumpster is here. It should take us a couple of hours to load it up

We got a little carried away and made it quite full. I jump on top to stomp some stuff down.

We are done and the first dumpster is being hauled away

Well that's all for now. We need to do a lot of planning and a lot of shopping for the next few rounds. I love the planning but Mike and I both hate the shopping.
Lisa


Tearing Out Walls and Ripping Up Tile
Back to the open area of the house. We still have to clean up the soffit area and add insulation before it can be covered with sheetrock.
Mike cutting nails from the wood.

Making sure it is all clear of any nails and wires.

Mike goes up into the attic for the first time to pull up wires. It is a very tight area.

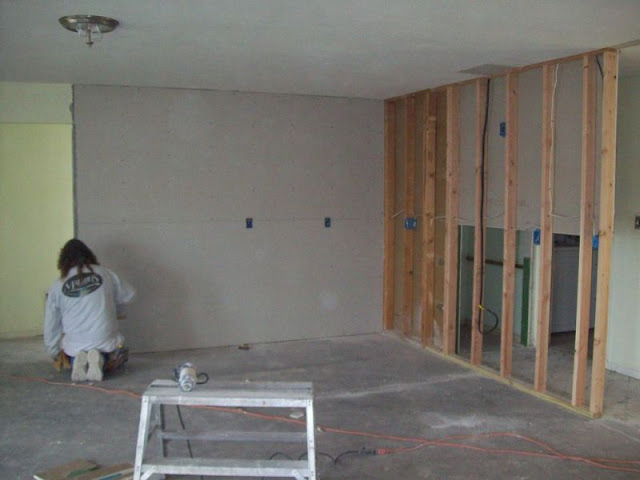
Onto another wall. We know where we are going to put the kitchen. Now it's time to get rid of the old walls and the old wiring.
Mike taking out the first wall where the old door was for the old den.

He is getting the sheetrock off the studs.

While he works on that I get to work on one of my favorite jobs. Yeah...I'm a little odd, lol.

Here I am putting in the insulation in the ceiling.
And the open soffit area is almost filled.

And back to Mike. He is on the last wall to be redone for the new kitchen.

Next he starts to work on the old header of the old pocket door. It needs to come down.

Pulling the old header down.

Mike pulling out the last wall.

New day...new job Onto the backyard. There were a couple of poles sticking out of the ground with rope when we bought the house. I guess at one time the previous owner used it to tie down a boat. Now we have to take it out.
Onto the backyard. There were a couple of poles sticking out of the ground with rope when we bought the house. I guess at one time the previous owner used it to tie down a boat. Now we have to take it out.
The rope was buried. Here is Mike trying to pull it out...and it was endless
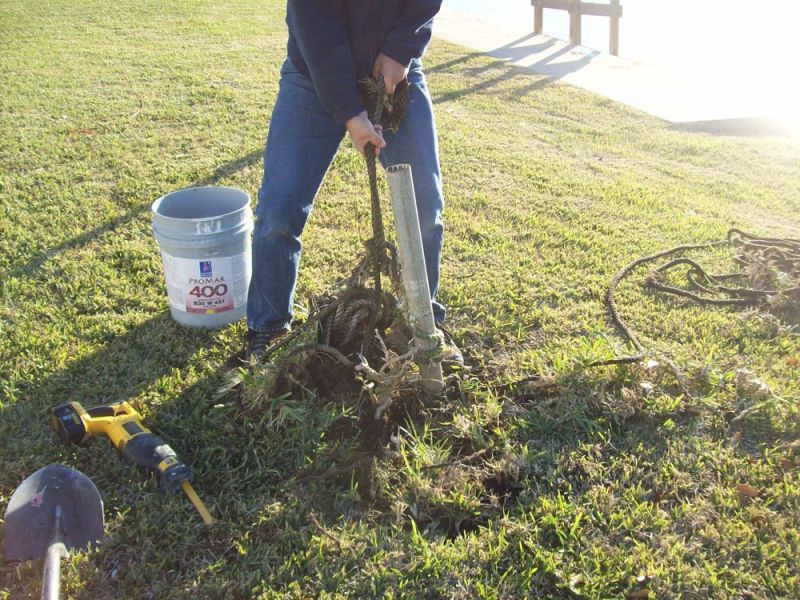
I am working on the second pipe. We are trying to get it out of the ground.

We can't get it out so Mike cuts it down below the surface of the ground.

That job is done
Back inside and it is night time. That is one of the benefits of living in a house while you remodel. You can work anytime you feel like it
We have to remove the black tile that is in the entrance way. The only tool we have right now is the ax...so Mike starts to bang away.

Hmm!!! Looks like we will need a better tool for this job. What a mess this old tile is.

I clean up the mess we made and we call it a day. We will have to go shopping for a new tool and it's time to get some new doors


French Doors
Here is another part of our story.
The back of the house had one 16 foot sliding door and one 8 foot sliding door. Mike and I debated whether or not to change these doors out. We had to work within a budget and new back doors would eat a lot of the budget up. Well after going back and forth we decided to go for it. Our vision for this house is to make it have a water view, and also make it fresh and new. Old sliding doors will not work with our vision....so out they go.
We start with the one big 16 foot door. We got the glass out.

Next Mike pulls up the floor track.

Then he works on taking the door frame out.

We put up a 2x4 just as a temporary support until we get the new doors in. I am trying to clean up the floor under the door track.

We decided on French doors with built in mini blinds for the new doors. This way you can always see the water, have some privacy when needed, and not have blinds or curtains blowing around.
The first door is in place.

And the second door is in place.

There was another problem with the original 16 food sliding doors. It allowed no privacy into the master bedroom. If someone was on the back patio they could see right into the master bedroom...not cool. So Mike and I decided to replace the one big 16 foot sliding door with two 6 foot French doors and build a small 4 foot wall near the bedroom for privacy.
Mike is anchoring the base for the new wall.

The frame for the new wall is done. (Do you like our fishing line holding the doors closed, lol? Without that the doors could swing open and fly out until we have them completely installed) We will have to install the door knobs as soon as everything is in place.
until we have them completely installed) We will have to install the door knobs as soon as everything is in place.
We bought cement board for the outside of the new wall. We will use sheet rock on the inside.
Mike cutting the cement board.

Mike installing the cement board onto the 2x4's.

And my favorite. Putting some insulation in

Once the doors are level and working properly we need to finish them. We fill in insulation around any of the air gaps. Now it's time for trim to make them look nice.
Mike screwing in the side trim.

The trim is done on the first two doors.

Same thing for the third sliding glass door. Mike unscrews the frame.

And pulls it off.

While we were at the store buying the doors we picked up a new gadget...and I get to use it first

It is a very cool tool
Another small wall needs to be built. Since we are replacing an 8 foot door with a 6 foot door we are adding the extra 2 feet on the outside portion of the new "big" room.

The three new doors in the main area are in along with the new door knobs.

OK....only one more sliding door to replace. The small bedroom in the back of the house has a 6 foot sliding door that goes out to the back patio.
Getting ready to take the glass out.

The glass is gone and Mike is working on the old frame.

The new doors are in and functioning.

Mike screwing in the new frame.

The last French Doors are in. Now we just need to fill the gaps and trim it out...oh and of course paint everything.

That's all for today. I hope you enjoyed the French Door story.
Lisa


The Bathroom Demo and Soldering Pipes
Good morning. Mike and I are in the middle of building a big shed but I can write a quick story.
I will take you back to the second bathroom demo. We are gutting the entire bathroom down to the studs and starting over.
Just a quick picture of Mike working in the laundry room. We need to take out the old appliances, replace them with new, and redo the room. Mike is working on the plumbing.

Onto the bathroom. We have that beautiful very 70's avocado green bathroom. We asked around and no one wanted anything from this bathroom so the quickest way for Mike and I to gut it, is to break it apart.
Mike is starting with the cast iron tub. These are just too heavy for us to remove in one piece so we have to break it apart.
Mike using the ax to break it...and these tubs are stubborn.

Taking a break and doing an easier job. The vanity.

The vanity is almost out.

Next is the toilet and to speed up the job Mike decides to just break it out.

Mike cleaning around the toilet area...yuck!! I hate that job.

And back to the tub

Using a crowbar on the tiled wall.

Mike carefully cleaning up the shattered pieces. If you ever break up a tub or tile be very careful. The pieces are very sharp and can cut you open.

While Mike is in the bathroom working, I am taking out the tack strips in the small bedrooms.

Mike working on the bathroom walls.

After the tub and walls are out we have a huge mess to clean up. What else is new, lol? It has to get worse before it gets better.

And more.

Time to take out the soffit above the tub.

And then the bathroom ceiling.

Getting a little side tracked, lol. Mike is taking out the door jams on one of the bedroom doors. We will be replacing all the doors in the house.

New door going into the laundry room/garage.

Mike is back up in the small attic. We need to add a fan to the bathroom.

Here I am using my new fun tool to take out the tile on the bathroom floor. Note....the fancy flip flops and socks Do not do this at home When Mike and I live somewhere when doing projects we tend to just jump into a job when we feel like it
Do not do this at home When Mike and I live somewhere when doing projects we tend to just jump into a job when we feel like it
Once the floor is out and we get cleaned up, it's time to work on the new tub. Mike needs to work on the plumbing for the tub.
Mike soldering the end on the shower pipe.

Soldering an elbow for the diverter for the shower.

The diverter with piping in place getting ready to be installed.

Prepping the pipe to be installed.

The diverter is installed and there are no more leaks It may look like a mess but this is a nice job.
It may look like a mess but this is a nice job.
The new ceiling fan and vent in the ceiling.

Of course I put the new insulation in.

The new electric for the new bathroom fan.

New window installed.

And the tub is in place.

The messy part is done. The house is prepped for new sheetrock. Time to call in a crew. They do it so much faster than Mike and I can. That will be next week. It is so nice when you get to the point of putting a house back together.
.
I hope you enjoyed this part of the story.
Lisa


Florida Flip 2...New Kitchen Walls and Porcelain Tile
Hello everyone. It's time for another part of our story. This is the last work we did the first winter we were in FL. We weren't supposed to work on this house at all the first year") . We were supposed to do one house per winter for fun...but Mike and I never know how to stop
. We were supposed to do one house per winter for fun...but Mike and I never know how to stop Oh well, when we come back in the Fall...it will be easy to finish.
. We were supposed to do one house per winter for fun...but Mike and I never know how to stop Oh well, when we come back in the Fall...it will be easy to finish.
Now that we have everything gutted we are ready for the new drywall and some of the finish work and painting
The studs are up and the electric is in for the new kitchen walls.

Mike and I hire out for the drywall and finish work. It is much easier and faster for people who do it all the time.
Kevin starts hanging drywall in the new kitchen area.

The kitchen walls are done.

Kevin patching the ceiling.

The bathroom walls are done.

And the bathroom ceiling.

The ceiling out in the main living area.

Our new post that had to be installed for the electric that will go to the new kitchen island.

The back of the new kitchen wall going down the short hallway to the laundry room. Another bonus of this house. The laundry room is inside Many of them here are in the garage.
Many of them here are in the garage.
Kevin spray texturing the ceiling.

Kevin is done so it's time for Mike and I to work. Now we can paint the house We stay with white because people usually see it as a clean slate. It isn't offensive to most people and you can very easily change it if you want to
. Now we can paint the house We stay with white because people usually see it as a clean slate. It isn't offensive to most people and you can very easily change it if you want to
First Mike and I move our temporary kitchen into the master bedroom. We don't want anything in our way.
We tape everything off and get started.
.
Mike spraying the ceiling.

As usual I do the trim.
Mike rolling the dining room area.

We went back and forth on what kind of floor to do. The last house we did had a very thick warm carpet. This house we want to keep light and bright. We chose an 18" Italian porcelain tile for the main living area.
And it's going to be a lot of work

Mike mixing the thin set for laying the tile.

Moving right along....and we need to move the refrigerator into the garage

And one more thing has to be moved out of the room so we can finish

I am spreading the thin set one of the last rows for the living room.

And the work continues. We lay the tile in the remainder of the living area. It was a big job for us. I don't think Mike and I will do that again.
After all of the tile was set with the thin set, we had to grout...the whole floor.
Mike filling in some grout.

And another view of the whole floor. Once it is all clean it will have a beautiful shine.

That's all for this story. We are almost finished with the inside of the house. The hard stuff is done Next time we will be working on the kitchen.
Next time we will be working on the kitchen.
I hope you all enjoyed the story.
Lisa
A New Kitchen
We went back to TN for the spring and summer. Now we are back and it's time to finish up this house....and lots of shopping to do. Mike and I hate shopping.
We got a big shopping trip done. The interior doors, plantation closet doors, bathroom cabinets, toilets, and kitchen cabinets are in the house. Now it's time to work.
What we have to now put together.

Mike is cutting out the bottom of the sink base cabinet to fit the plumbing.

In moving the kitchen we decided to keep the original plumbing in the same location. It was a workable idea and Mike and I wouldn't have to deal with tearing up the concrete floor and moving pipes. It's always spooky doing that as the pipes can break. Mike working on shims for us to place the base cabinet around.

Next we installed the new Island. The cabinets are in place.

Mike starting on our first upper cabinet. We always start with the corner and work our way out.

The cabinets are in place and the double thick plywood is on the Island.

Mike screwing the two sheets of plywood together to make a strong counter top.

Mike cutting down the top.

Then he uses a template and draws the sink onto the top of the plywood. Next he cuts out the square for the sink.

Time to work on the counter top. We put it together on two buckets. This was so we can screw and glue the corners together.

Next we put it in place to take measurements.

We take it back down and Mike puts painters tape on the top so he can cut the fit for the stove. The tape protects it from chipping.

We are done with our part. This time we called someone in to do the formica top on the Island. We have done this work before but we don't have the tools anymore.
They start out by glueing the edge strips on.

Next they sand the whole Island top to make it smooth.

The next part is a two step process. First glue has to be applied to the back of the formica.

Then the glue gets applied to the plywood. They add some dowels. The dowels keep the top formica and the plywood from instantly glueing together.

Then they carefully put the glued formica piece on top of the dowels.

They set it in place and start to take the dowels out.

Once that is glued down they cut out the formica where the sink will be.

OK..back to Mike and Lisa world and no people around
The appliances are here.

Using the template to install the microwave.

Mike screwing on the cabinet handles.

The kitchen is done. Back to the second bathroom.
Mike starts the tile on the shower/tub wall.

First row done.

Tile is on the wall.

And the floor is next.

Finally the grouting.

After I get that all cleaned up we grout the floor.
The tile is finished.

That is all the pictures I have of the work we did. I think we were just too busy to take pictures for the rest. Here are the other things we did on the house.
All interior doors were replaced, closet doors were replaced with plantation doors. We finished painting the interior of the house, we installed vanities and toilets, we added a a new floor to the laundry room and all appliances were replaced.
On the outside. We added rock to all the gardens to keep the dirt splatter away from the house. We added some plants. We pressure washed the house and the driveway. The house got repainted. The back patio floor got painted and the front walkway was also painted.
I think that's all


The Before And Afters
And now as promised it's time for the final pictures. You might be pleasantly surprised as this is the first house "ever" that Mike and I furnished
OK..here we go. I will save the biggest change for last
The spare bedroom in the back:
Before

After

The front spare bedroom:
Before

After

The second bathroom:
Before

After

And
Before

After

The master bedroom:
Before

After

And
Before

After

The Master Bath:
Before


After

Before

After

On to the outside of the house.
Before:


After:

The back screen room:
Before

After

The back patio:
Before

After:

Of course the backyard view stayed the same

And now for the biggest changes.
If you remember this was the original layout with walls blocking the water view:

View from the front door:
Before

After

The Original Den:
Before

After

The Kitchen:
Before


After

The Living/Dining Area
Before

After

And a few more finished pictures:


That's all for this Flip House. I hope you all enjoyed the process and the final product. I know the new owners love it
You are living my life. I love it ! Thanks for sharing so generously. The house is beautiful.
ReplyDeleteAnnieA
We enjoy it:) Thank you for the nice compliments.
Delete