Hello everyone. My husband, Mike and I love to remodel. He has been pestering me about tearing my kitchen in our house apart . I said no since it doesn't need it. So we made a compromise and decided to tear out the kitchen in our 2009 Winnebago ERA. We have owned our ERA for three years now and plan on keeping it forever. We love the body of it but need to fix a couple of the practical problems.
This is our plan:
First off we have two passenger seats which we use maybe twice a year and they take up a lot of wasted space. They need to go. Next the kitchen counter area doesn't have enough room. There are no lower cabinets which could be used for incredible storage space. Our whole goal is to create more storage and get "things" out of site while we travel.
Here are a couple of stock photos of what our motorhome looked like before we tore it apart, lol.
. I said no since it doesn't need it. So we made a compromise and decided to tear out the kitchen in our 2009 Winnebago ERA. We have owned our ERA for three years now and plan on keeping it forever. We love the body of it but need to fix a couple of the practical problems. This is our plan:
First off we have two passenger seats which we use maybe twice a year and they take up a lot of wasted space. They need to go. Next the kitchen counter area doesn't have enough room. There are no lower cabinets which could be used for incredible storage space. Our whole goal is to create more storage and get "things" out of site while we travel.
Here are a couple of stock photos of what our motorhome looked like before we tore it apart, lol.
Before view from the front looking back with both passenger seats.

The original kitchen area with only tiny drawers for storage. They don't even go to the back wall.

It's demo time
 We love doing demo. The scariest part about motorhome demo is the question "what are we going to find?" We have no idea how the factory hooked things up before we take it apart. Hopefully we can put it back together again, lol.
Thankfully we have a beautiful day to start working.
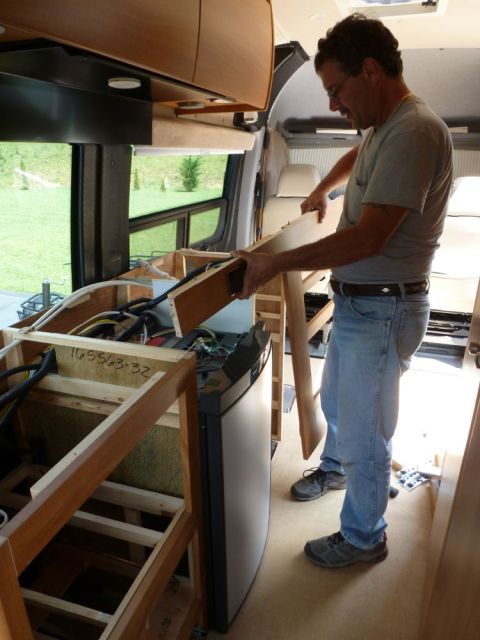
The first seat is out.

Mike unbolting the second seat.

The seats are out and we are left with some holes.

We bought new base cabinets to install. We thought we would have to custom order cabinets to match the existing upper cabinets. We got lucky and found stock cabinets that are very close to the same color
 .
.
I got ahead of myself in my excitement. We can't install the new until we get rid of the old, lol.
Some of the drawers are out and Mike is now unscrewing the microwave.

Mike taking out the microwave.

Microwave is out.

This cabinet also holds the propane heater. Since we have a choice of three heaters to use we decided to use this space for storage and get rid of this heater. Anyone want a propane heater....like new, lol?
 We have our electric heater that is with our AC unit and we prefer to use our portable tower heater when needed. It is much quieter.
Mike unscrewing the bracket that held the microwave in place and also the screws for the heater. You can see the heater on the bottom right.

Next, I help Mike take the heater out. Sorry...no pics. I was a little busy, lol.
Our cabinet is now empty and look at all the space

Now we have to get the countertop but first we have to take out the stove and the sink.
I am not unhappy about taking this sink out. First it leaks from the faucet. And it leaked right into my top two drawers that were under the sink making them useless.
 I also didn't like the round sink with the side faucet. It was not easy to use. So out it goes.
Mike taking out the sink after we unscrewed the the mount and cut the caulk.

Next is the stove. I have no problem with the stove so it stays. Mike is unhooking the gas line and yes the gas is off
. 
Now it's time for the countertop. We broke part of it while trying to pull it out. It actually just cracked.

Mike taking out the front plate that is above the refrigerator and undoing the electric outlet. He will be redoing all of our outlets and giving us more.
Mike working on the old electric.

He also takes out the 12 volt line and the gas to the refrigerator. The refrigerator stays since I have no problem with it....and I am a big cook
Time to take out the old cabinets....which really aren't cabinets. They were frames built into place and covered. There is a lot of glue on these parts. Piece by little piece we get them out.
Mike working on a small piece by the water heater.

Our debris after pulling things apart.

The only things left are the two sides to the refrigerator. RV refrigerators don't come with sides. The side pieces are built at the factory. We will use the sides of our new base cabinets for the refrigerator sides.

and

Mike cutting down on the electrical wires. He hates unnecessary wires and pipes.

And finally...the last piece of factory wood....that is glued. Mike taking it apart little by little.

We are now cleared out and need to clean up. Tomorrow we will start on the new install. I love seeing things go back together
OK...time for me to do some work. Have a great day and I hope you enjoy the story and pictures.
Part 2
Time for the new cabinets and countertop to go in.
Mike wanted me to remind everyone that this job was not as easy as we make it look. It is very nerve racking to redo things in motorhomes and you never know what you might find underneath. It takes a lot of time especially removing all of the glue and black rubber stripping that Winnebago used.
OK....now onto more pictures.
Time to work on the cabinets. First we have to bring the first cabinet inside to see how the depth is going to be. If it is too wide we will need to cut the backs off of the new cabinets. We measured and we are pretty sure it will be OK. We bring the first cabinet into the back and put it in place. It does not extend past the refrigerator Mike measures the cabinet around the wheel well.
Time to cut.
Mike starting to cut the back of the cabinet out to fit over the wheel well.
Mike wanted me to remind everyone that this job was not as easy as we make it look. It is very nerve racking to redo things in motorhomes and you never know what you might find underneath. It takes a lot of time especially removing all of the glue and black rubber stripping that Winnebago used.
OK....now onto more pictures.
Time to work on the cabinets. First we have to bring the first cabinet inside to see how the depth is going to be. If it is too wide we will need to cut the backs off of the new cabinets. We measured and we are pretty sure it will be OK. We bring the first cabinet into the back and put it in place. It does not extend past the refrigerator
Mike measures the cabinet around the wheel well.Time to cut.
Mike starting to cut the back of the cabinet out to fit over the wheel well.

Using the reciprocating saw to cut out the rest.

And our measured opening is cut. Hopefully it fits

It fits and we got it in place.

Next we measure some boards and paint them to cover the inside of the cabinet. We don't want any openings into the motorhome. Winnebago left two open holes in the bottom of the old cabinets. No wonder why we had mice inside

Here is our supervisor, Niki. No matter what project we do, Niki will always find the most comfortable spot to sit whether a towel, sweatshirt, or paint cloth, lol.

Next Mike works on the "wet" cabinet. We decided to designate one cabinet for all the plumbing, the water heater and also the sink above.

We took the styrofoam off the water heater so Mike could work on things. He had to cut down the drain pipe and add a part of his own. He will attach a longer pipe to this later.

Mike already cut the hole in the cabinet for the water heater. Now he is cutting a hole for the drain pipe.

Before all of the cabinets are installed I paint the back tops black. You can see the backs of the cabinets from the outside of the motorhome. The windows are tinted but we want to blend them as much as we can.

Mike uses the cutoff wheel to cut off the bolts from our old passenger seats. They are above the floor and we need to level it before the last cabinet and new floor can go in.

The bolts by the door.

The cabinets are in place and the drain pipe will work

Time for the wiring. This is where I am no help at all

What Mike has to figure out.

Drilling a hole inside the cabinet and through the shelf for the pipe that will hold the electric wiring.

The large pipe to protect the electric wires.

Where the wiring begins...and it needs to go through each cabinet. By the time Mike gets to the front cabinet most of the wires will drop off except for the last electric outlet.

The tubing that will protect the wires behind our new drawers.

And over the refrigerator.

And into the front two cabinets and out the front cabinet where Mike will install our new electric outlet.

Next is plumbing.
Mike works on the hot and cold water using pex tubing inside the "wet" cabinet.

Mike uses the torch to soften the pipe so it will slide in easier.

Crossing fingers for no leaks. Time to test Mike's plumbing work. He hooked up a temporary faucet to the hot and cold pipes and is using a coffee can to catch the water when it is turned on.

Yay...no leaks....better than Winnebago
Now we are ready to try the countertop. First we open the back doors and take the sofa bed out. This is one of the main reasons we bought an ERA. We also use this motorhome as a remodeling van and we need to get the back seat out for the cargo space.
Next we carry in the countertop and measure for the length.

We bring it back outside.
Now that we have the basics ready to go....we bolt in the cabinets to the exterior wall of the motorhome. This is a scary part. You do not want the screws to go through the outside wall. Mike put the first screw in and he told me to go out and see if it went outside. He followed me out and was behind me. When I got around to the other side I said "oh no" and he said you're kidding me. Gotcha ya. I know...it was mean but he would have done the same me
Mike makes the first cut in the countertop.

We bring it back in and take measurements again. It takes awhile but we decide that we can get away without having to cut the whole backsplash off. This was very tedious and nerve racking. Lots of back and forth with the countertop, lots of measuring, and lots of rechecking before we cut anything.
Next we measure for the new sink and the stove. Mike makes the fist cuts for the stove using the circular saw for cleaner cuts.

And then the jigsaw for the tighter cuts.

We are ready to go back in but first we want to make sure there is no gap or rubbing between the countertop and the cabinets.
While I paint the back of the countertop(to hide it from the outside windows), Mike puts some small weather strip around the whole perimeter of the tops of the cabinets.

We get the countertop on and Mike hooks up the stove and turns on the gas. All is good
Next he installs the sink.

And the plumbing from under the sink.

After that is done it's time for the electric outlets.
Our ERA came with a total of 6 outlets for the kitchen area. Two on each end of the cabinets and two more in the middle above the refrigerator. We were constantly juggling the back two outlets for the coffee maker, the toaster, the satellite receiver and Mike's headphones. Mike is going to fix this by installing two surge suppressors with six outlets each on each end of the cabinets. We will never use all of these outlets but it sure is nice to have them
Mike installing the first electric strip.

Then he installs the one on the front side. The cabinets, counter and electric is installed.
View from the back.
And from the front.

Mike will spend time making sure all of the cabinets and holes are completely sealed and secure for traveling.
I hope you enjoyed today's pictures.
Next will be the floor and the finishing touches.
Have a wonderful day!!!
Time to replace the floor and install a new screen door.
On this day, we were supposed to take off from the motorhome...not. I was down in the house working on inside stuff and canning. I took a break and went up to check on Mike. This is what I found
Half of the old flooring is out of the motorhome, and of course Niki found a seat.
On this day, we were supposed to take off from the motorhome...not. I was down in the house working on inside stuff and canning. I took a break and went up to check on Mike. This is what I found
Half of the old flooring is out of the motorhome, and of course Niki found a seat.

I went inside the motorhome to see what Mike was up to. He was patching the old floor and getting it ready for the new flooring. He has two spots to fix before we can put the new floor down. First is the hole where the old post and table went. We never used this table because it made the motorhome too crowded so out it goes. And he has to patch the floor where the one back passenger seat was.
Mike cutting out some of the subfloor so he can patch it.

The square is out.

Patching it with bondo.

While he does that I get the perimeter of the rest of the floor cut free.

I get that out of the motorhome and start scraping all the glue off the floor.
Mike fills in the last hole which is from the old seat that was behind the front passenger seat.

We are ready. The bondo is dry and the floor is scraped clean of the glue.
We are using individual vinyl floor strips. We chose this for ease of installation, color, and availability at the store.
Mike starts at the side door opening.

Once he gets past the first strips I help him with peeling back the paper and lining up the strips to lay on the floor.
It's coming along nicely.

After the floor we go back to finishing the counter. We have to use what is called end caps which is sold separately for stock counter tops. They are made to be heated on the the ends of the counter top.
Mike ironing the end cap onto the front of the countertop.

And ironing into the back part of the counter.

Next Mike and I discuss adding a screen door since the ERA motorhome does not have one. Mike wants to make a kit and try to sell it...unfortunately it is too complicated for the average person to install.
We start out by testing the size with a door from our house.

Now that we have the size we have to search down a retractable screen door that will fit. We found one Larson door from a Lowe's store about 3 hours from us. So off we go. We hope this works. Then again Mike can make most things work:)
Mike starts off by placing the new door in position. Next he has to take measurements to make templates. Side walls have to be made and painted. The hard part is making the side walls because they have to be curved.
Mike gets the right side done...this is the easier side:

Next he works on the left side. Mike had to take out part of the ceiling to install the side wall and then replace it.

The door from the inside:

Looking at it from the back of the motorhome:

And now we have a new screen door....maybe the only Era with a real retractable screen door out there:) We are very happy with the result:)

We are finished with this remodel.
Here are the before and after pictures of our motorhome remodel:
Looking from front to back "before"

After:

and looking forward:

The old counter before:

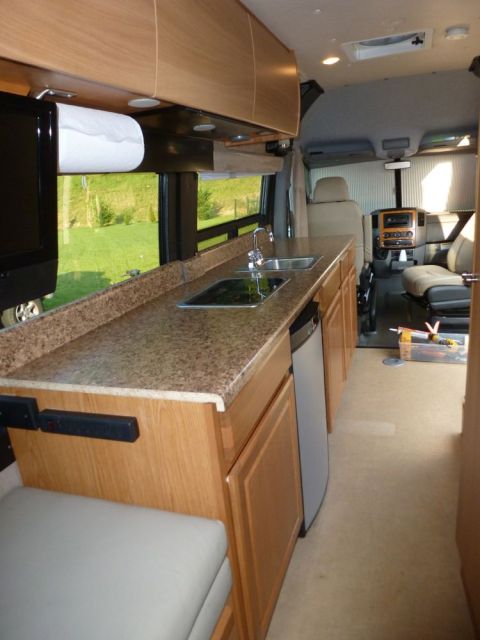
The new counter with all the space:)

All the new storage space under the cabinets:

The "wet" cabinet where the water heater is:

My new storage:

The side door before from a stock photo:

And our new screen door after:

From the inside:

We are done with our motorhome remodel. We love the new space, storage and new screen door.
Let's go camping:):)
Hi Mike ... I have a question for you. How is the microwave plugged in?? Is it plugged into a regular 110V plug or os ot hardwire in somewhere. I need to replace mine and before I start I was just wondering??
ReplyDeleteThanks
Karsten
Yes it is a regular 110v.
DeleteThanks ... that is one of the first things I have to do this spring. Change the microwave. I am toying with the idea of putting in some kind of toaster oven instead. I don't use the microwave much at all ... I'll have to give it some though once I get out there.
ReplyDeleteToaster ovens are great for Rver's. When Mike and I had the big motorhome I had the room for one. I was not allowed to cook fish inside the motorhome so I used the toaster oven outside.
DeleteWow nice job & nice views of your back yard., I have the same counter top in my S&B kitchen. Is your hubbie available? I would like to put a bigger sink in our 82 Pace Arrow?
DeleteWe put the same counter top in one of our remodels:) Sorry hubby doesn't hire out. We like the mike and lisa world where we can be us, lol.
DeleteYou didn't put the microwave back at all? So no oven anywhere?
ReplyDeleteYes we have a microwave. It's in our Before and After pictures but I also added it in today's post.
DeleteI'm about to start my first remodel and I've lots of questions but I'll just ask some basics. The cabinets look like the type you can buy at a home improvement store, is that where you got yours or are they specific for a motor home? How do you secure the cabinets? When I remodeled my home bathroom, I screws the cabinets to the wall studs but I don't know if they would work with a motor home.
ReplyDeleteThanks for writing in.
DeleteWe got very lucky with the cabinets. We bought stock cabinets from Lowe's. Mike and I thought we would have to modify them but they fit just right. They were screwed into the wall behind them. Be very careful of any electrical behind your walls.
Wow! I have to give it to you guys because that looks like a lot of work. The finished kitchen looks really great. You even saved a lot of money by doing the remodeling by yourselves. Kudos for a job well done!
ReplyDeleteArthur Bryant
Thank you. It is so much better than how the factory designed it.
DeleteWe got a new ERA same model today we were so busy with fixing the screen that just feel apart we haven been able to drive it or even look at anything else. Our ERA sticks out and cover a part to the side walk when parked in our drive way. You did a gret jod I wish you could help us fix ours up we would just like the screen, Fix right now.
DeleteI really like what you did By the way where do you live in Or? We want to know how comfortable the bed is and do you sleep in the full king size be our make it in to twins. how do you get in and out of bed at night to go to the bathroom We live in Co the state where they all think people smoke pot and when they drive in other states they are being detained.and their cars searched for pot.
DeleteI hope you got your screen fixed.
DeleteThe bed takes work, lol. My DH is lucky and sleeps al night…me I have to climb over and get out of the cubby hole bed. It is pretty comfortable.
What brand of flooring did you use and is it holding up?
ReplyDeleteI'm sorry but I don't remember the brand. It was an in stock self stick from Lowe's. It has moved and separated a bit at the seams. I would not use that one again.
DeleteIs there an after picture of the space where you took out the chair by the door I can find somewhere? We have a Roadtrek with a chair in that same place and I would love to take it out and put in a retracable screen we already own.I think I would like to add a small countertop cabinet there, as well.
ReplyDeleteThanks!
I'm glad you found it.
DeleteGood luck with your changes:)
Never mind, I see it. Sorry!
ReplyDeleteThis is fantastic! I would love a van like this. It would be easier to drive than a huge camper, but would still have some nice luxuries. http://www.congroremodeling.com
ReplyDeleteI noticed that cabinets are made out of particle boards. Is that correct?
ReplyDeleteNot good for safety -- industrial RV cabinets are made out of 3/4" plywood.
Only the fronts are 3/4" plywood on our original motorhome cabinets. The boxes were scrap junk wood. Our cabinets are much better than RV stuff. I wish they would use full box cabinets in RV's and not scrap with tons of glue and staples, lol.
DeleteThis is amazing.. And luxurious too..!!
ReplyDeleteWill try to implement this process soon :)
Thank you. This week we did some more work. We took out the sofa and added two twin beds with some incredible storage. Will post soon.
Delete