
Mike wanted me to remind everyone that this job was not as easy as we make it look. It is very nerve racking to redo things in motorhomes and you never know what you might find underneath. It takes a lot of time especially removing all of the glue and black rubber stripping that Winnebago used.

OK....now onto more pictures.
Time to work on the cabinets. First we have to bring the first cabinet inside to see how the depth is going to be. If it is too wide we will need to cut the backs off of the new cabinets. We measured and we are pretty sure it will be OK. We bring the first cabinet into the back and put it in place. It does not extend past the refrigerator
 Mike measures the cabinet around the wheel well.
Time to cut.
Mike starting to cut the back of the cabinet out to fit over the wheel well.

Using the reciprocating saw to cut out the rest.

And our measured opening is cut. Hopefully it fits


It fits and we got it in place.

Next we measure some boards and paint them to cover the inside of the cabinet. We don't want any openings into the motorhome. Winnebago left two open holes in the bottom of the old cabinets. No wonder why we had mice inside


Here is our supervisor, Niki. No matter what project we do, Niki will always find the most comfortable spot to sit whether a towel, sweatshirt, or paint cloth, lol.

Next Mike works on the "wet" cabinet. We decided to designate one cabinet for all the plumbing, the water heater and also the sink above.

We took the styrofoam off the water heater so Mike could work on things. He had to cut down the drain pipe and add a part of his own. He will attach a longer pipe to this later.

Mike already cut the hole in the cabinet for the water heater. Now he is cutting a hole for the drain pipe.

Before all of the cabinets are installed I paint the back tops black. You can see the backs of the cabinets from the outside of the motorhome. The windows are tinted but we want to blend them as much as we can.

Mike uses the cutoff wheel to cut off the bolts from our old passenger seats. They are above the floor and we need to level it before the last cabinet and new floor can go in.

The bolts by the door.

The cabinets are in place and the drain pipe will work

Time for the wiring. This is where I am no help at all

What Mike has to figure out.

Drilling a hole inside the cabinet and through the shelf for the pipe that will hold the electric wiring.

The large pipe to protect the electric wires.

Where the wiring begins...and it needs to go through each cabinet. By the time Mike gets to the front cabinet most of the wires will drop off except for the last electric outlet.

The tubing that will protect the wires behind our new drawers.

And over the refrigerator.

And into the front two cabinets and out the front cabinet where Mike will install our new electric outlet.

Next is plumbing.
Mike works on the hot and cold water using pex tubing inside the "wet" cabinet.

Mike uses the torch to soften the pipe so it will slide in easier.

Crossing fingers for no leaks. Time to test Mike's plumbing work. He hooked up a temporary faucet to the hot and cold pipes and is using a coffee can to catch the water when it is turned on.

Yay...no leaks....better than Winnebago
Now we are ready to try the countertop. First we open the back doors and take the sofa bed out. This is one of the main reasons we bought an ERA. We also use this motorhome as a remodeling van and we need to get the back seat out for the cargo space.
Next we carry in the countertop and measure for the length.

We bring it back outside.
Now that we have the basics ready to go....we bolt in the cabinets to the exterior wall of the motorhome. This is a scary part. You do not want the screws to go through the outside wall. Mike put the first screw in and he told me to go out and see if it went outside. He followed me out and was behind me. When I got around to the other side I said "oh no" and he said you're kidding me. Gotcha ya. I know...it was mean but he would have done the same me
Mike makes the first cut in the countertop.

We bring it back in and take measurements again. It takes awhile but we decide that we can get away without having to cut the whole backsplash off. This was very tedious and nerve racking. Lots of back and forth with the countertop, lots of measuring, and lots of rechecking before we cut anything.
Next we measure for the new sink and the stove. Mike makes the fist cuts for the stove using the circular saw for cleaner cuts.

And then the jigsaw for the tighter cuts.

We are ready to go back in but first we want to make sure there is no gap or rubbing between the countertop and the cabinets.
While I paint the back of the countertop(to hide it from the outside windows), Mike puts some small weather strip around the whole perimeter of the tops of the cabinets.

We get the countertop on and Mike hooks up the stove and turns on the gas. All is good
Next he installs the sink.

And the plumbing from under the sink.

After that is done it's time for the electric outlets.
Our ERA came with a total of 6 outlets for the kitchen area. Two on each end of the cabinets and two more in the middle above the refrigerator. We were constantly juggling the back two outlets for the coffee maker, the toaster, the satellite receiver and Mike's headphones. Mike is going to fix this by installing two surge suppressors with six outlets each on each end of the cabinets. We will never use all of these outlets but it sure is nice to have them
Mike installing the first electric strip.

Then he installs the one on the front side. The cabinets, counter and electric is installed.

View from the back.
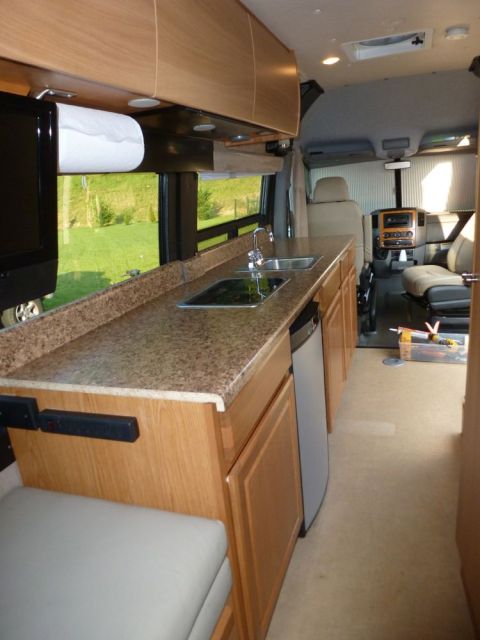
And from the front.

Mike will spend time making sure all of the cabinets and holes are completely sealed and secure for traveling.
I hope you enjoyed today's pictures.
Next will be the floor and the finishing touches.
Have a wonderful day!!!

 I am going to take you back to the end of March to see how we built a closet in our bedroom...
 The only good thing about the cows doing that is it saves on weed eating time....but they do stretch out the fence and we can't have that.

 Yeah...I tried doing the measuring "on center" but that didn't work out. Then I tried measuring the whole board into sections and that didn't come out even


