Showing posts with label Nail Gun. Show all posts

Monday, June 17, 2013

Chapter 158...Adding The Ends To The Building

We got the shingle roof complete in the last story now it's time to close up the ends:)


We will be using cut up boards from the T1-11 for our end pieces.  First Mike has to add extra 2x4 scabs for something to nail the new boards into:


After he nails those in we take careful measurements of the angles.  We will need to use a total of four boards and cut them down to make the peak and the angles.

Mike drawing out one of the boards from a template:


We have the two peak boards complete:


After we get them measured and cut, I paint the boards to match the building.  I let them dry outside in the sun before we can install them:


Mike nails up the first board:

After we get the first two boards up we decide we don't like the way the lines from the top boards don't line up "exactly" with the bottom boards.  Ugh....sometimes being picky is a pain in the butt, lol.


So we take those two done and start over:


OK back on track and we got it right.  We have to start from one side instead of the peak and work our way to the other side.  We measured, cut the angles, and painted the boards.  The first one is up.

Ah...much better:)  We are happy with that:


Mike nailing in the second one:


While I am inside painting:


Nailing in the last one on the front side:


We are finished enclosing one end:


Onto the back side.  Same story different side.  Mike nails the first one in:


And the second one:
\


Mike cutting the angle that we have measured:


Woo hoo.  Both ends are finished:


The next day we decide to work on the land at the store property.  We still have a lot of finish work to do.  So we will do a little at a time.

We stop off at the barn and push some of the loose floor hay onto our trailer:


We cover it with a tarp and I take that to the store.  Mike follows me in the tractor:


Once we are there I start working on the shallow ditch by raking, seeding and throwing out the hay.  Mike scoops dirt to fill in one of our low spots:


He gets that spot raked out:


And I get the seed and straw on it:


The ditch line that I worked on:


While we are there one of the people we have met in the area stops by with coffee for us and to chat.  It was a very nice gesture.  Too bad Mike and I didn't have our cups with us, lol.


After we got finished I left first and Mike followed me home.  To show you how far we have to drive I took this picture, lol.  I am on our driveway looking through some trees.  It's really nice when you can work that close to home:)


That's all for today.  I hope you enjoyed this story and I will write again soon.  Have a great week:)

Monday, June 10, 2013

Chapter 155...The Shingle Roof


The time has come to put the shingles on.  The morning starts out rainy so Mike and I went to town to pick up more roofing nails.  We have a Bostich Nail Gun and found a generic brand of roofing nails that fit our gun:)  I love when we get a deal.


BTW, if anyone is having trouble posting to my blog a friend of mine told me what you should do.  From Jaxson:)

"Just pick 'anonymous' type your message then I sign my name at the end of it. That way you don't have to go through all the registering on the other choices or use your FB account."


Later that day the skies clear up.  Mike and I decide to start the shingles.


Mike starts out by nailing the starter strip on:


After the strip is on we can start with the shingles.  We start with the very first row and work our way backwards and to the ridge of the roof.  Once we get a few rows on, Mike and I can turn around and work our way up:


I'm lining up and laying out the shingles for Mike to nail:


Almost to the top of the back side of the roof:


Working on the other side.  We work on about 6 rows at a time:


Woo hoo.  It only took us 2 1/2 hours to get the back of the roof done:)


Tomorrow is another day and we will start fresh on the front half of the roof.


Mike starts again with the starter strip:


The starter strip is on and we are ready for the shingles:


Mike starts with the first shingles at the far end:


Again...working on about 6 rows at a time and working our way up to the ridge:


The last of the regular rows of shingles.  This side took us another 2 1/2 hours.  Not bad:


Now for the part that will slow us down.  We need to cut shingles down for both sides of the ridge and then we also need to cut the ridge cap pieces.  I start cutting the long lengths, which by the way are much easier to cut when they are warmed by the sun:):


Mike nailing on the strips that I cut up:


After the ridge line is done on both sides Mike and I work on cutting the shingles for the ridge caps.  I cut the squares out and Mike cuts the angles:


Mike setting the ridge caps lined up:


Our nice cuts for the ridge caps:


Ah....the last shingle going on the roof:


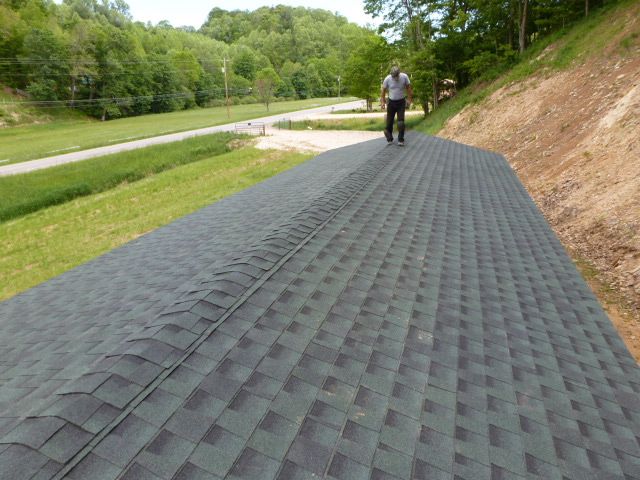
Mike walking the ridge to make sure everything looks good:


Yay...the roof is done and no more high ladder work:)


LOL...Mike told me that we were never doing another roof...that was 3 roofs ago...Hmm!!!


This is the first real mess we made.  Usually Mike and I have a very clean work site but not today, lol:

And:


Lucky for us our neighbor started a big burn pile and we can clean up:


We load all the debris on to the trailer and take it to the burn pile next door:


That's how we clean up in the country:)


I hope you all enjoyed this story and I will write again very soon.  Have a wonderful week:)

Monday, May 27, 2013

Chapter 152...The Trusses Are Here


Today is the delivery day for our trusses.  We have no idea what time the trusses will arrive but we have been told that the driver has our phone number.  Mike and I decided to take a ride over to our old roller skating rink which is now an antiques store to kill some time.  Sure enough as soon as we get out to the car the driver calls us.  Good timing.  Unfortunately when we pass him he is in our home driveway and not at the store.  We tell him to back out and follow us to the store.


All 25 trusses being dropped.


Oops...it looks like they are going to tip over.  


After they are on the ground, Mike and I cut the straps and bring them inside the building.  We have to go back to the house and get the tools we need to start working.  In the meantime we don't want to leave the trusses outside.


Now you will see why Mike and I only went 15 feet wide with this building.  The trusses are 16.4 feet long.  In doing this Mike and I can handle doing this ourselves.  You all know we hate when we have to deal with "other" people on our worksites, lol.


With two ladders ready to go I help Mike get the first end truss up.  We line it up with the edge of the building and Mike starts nailing:


We work together getting each truss on top of the building.  Then we stand them using the lines we made the other day for the correct placement.  I hold the truss in place while Mike continues to nail.  Once we have a few trusses up Mike nails in a 2x4 to help stabilize the truss.  We call these 2x4's rat runs.


Mike nailing in another rat run to the top portion of the trusses:


You can see we have 2x4 rat runs running along the bottom of the trusses and also underneath the top of the trusses.  We will do this for the entire length of the building and they will be a permanent part of the building:


Almost half way done:


Since we got a late start today we only got about 3/4's finished but Mike did call in an order for the plywood for the roof:)


The next day we go back with our tools and get set up:


We are working our way to the other end of the building.  It's going to get tight here so we decide to put all the trusses up top and slide them one by one into place.  The trusses are top heavy and always make me nervous when they swing down.  I tend to fight the natural momentum of them and Mike tells me all the time to relax, lol.

The rest of the trusses are up and hanging upside down:


Mike stays on one ladder on one side while I am on the other ladder on the other side.  One by one we flip the truss up into place and Mike starts nailing.  Here I am getting ready to flip a truss:


Getting down the to the last of the rat runs:


All of the trusses are up.  That wasn't too bad.  If you keep your store/home narrow and have a low pitch it is much easier to install yourself.  The bigger you make things the more you need help and we Mike and I don't like help, lol.


Mike cuts off the extra rat runs that don't reach another truss:


Our next delivery.  We got plywood for the roof, clips to hold the plywood together and trim boards for the outside of the store:


Mike and I measure the board to be cut.  These boards cover the outside of the truss and will run the whole perimeter of the building.  This is called fascia board.
 

Mike nails one in place:


The front fascia boards are up:


After that we carry all of the plywood and the other boards inside the building.  Since concrete floors are always damp we lay out some junk wood to protect the good wood.  We don't want to lay the good wood right on the concrete floor.  It will warp.  Next we have to cover everything up because the rain is coming...again!!


Ready for the rain:


That's all for this story.  We did pretty good getting the trusses up and now we are ready to start the roof.  Our next story will be about getting the plywood on top of the trusses...ugh!! and getting the roof started.

I hope you enjoyed this story and I will write again soon.