Showing posts with label Trusses. Show all posts

Monday, June 3, 2013

Chapter 154...Time To Get The Plywood On The Roof And Seal Up The Store

Good morning everyone.  Mike and I have been busy working on our property and today we will get back to working on the store.  Let me take you back a couple of weeks and tell you about getting the store closed up from the elements.


We have a couple of rough days of work ahead of us.  We couldn't get back to work on the roof because of the rain.  At least we got the trusses off the ground and nailed in so they won't be warped.

Our first day back to working on the store after all the rain didn't start out so well.  It poured that morning and we had to cancel our shingle order.  Later that day it began to clear up.  Mike and I met a man and sold him a couple of solar panels.  By the time the man left the weather was looking better.  Woo hoo....time to get to the store and do some work:)


Now to see how everything held up.  The tarps did a pretty good job and it looks like most of our wood is safe but it is a wet mess.  It will be good when we can stay dry:


Mike nailing up the fascia on the back of the store:


Now that all of the fascia board is up it's time to get the plywood on the roof...oh joy, lol:


To make sure we don't get hurt Mike and I each take an end of the plywood and shove it on top of the roof.  The first plywood sheet is up and Mike is nailing it down to the trusses:


Moving along the front of the roof.  Mike wants to get the first rows on the front and back of the building done.  The next rows will be easier to work on since we can both be on the roof:


How it looks from the inside:


We got 6 sheets of plywood on the roof and nailed down on the front side.  Next we work on the back side of the store.  Mike is getting close to finishing the first row in the back:


We are done with the first rows of plywood on the front and back of the building:


We got 12 sheets of plywood nailed on:


After we get done with that we call it a day.  The next day is going to be a very full and rough day for the two of us.  We need to get the rest of the plywood up and installed and we also need to put down the ice and water coating until we can shingle it.


Mike and I wake up knowing it will be hard on us today.  We pack up the car with all the tools, snacks and lots of water.

Setting up:


We use the same system for getting the plywood on the roof.  Mike and I each take and end and throw it on top of the roof.  Mike clips the next sheet of plywood to the one below it and starts to nail it to the truss:


While we are working on the roof the delivery comes for our shingles:


And more plywood:


We also ordered 5 rolls of Grip Rite Eave and Valley Protector.  Roof Protector  This is some great stuff and gives you an instant protected roof until the shingles can be installed:  


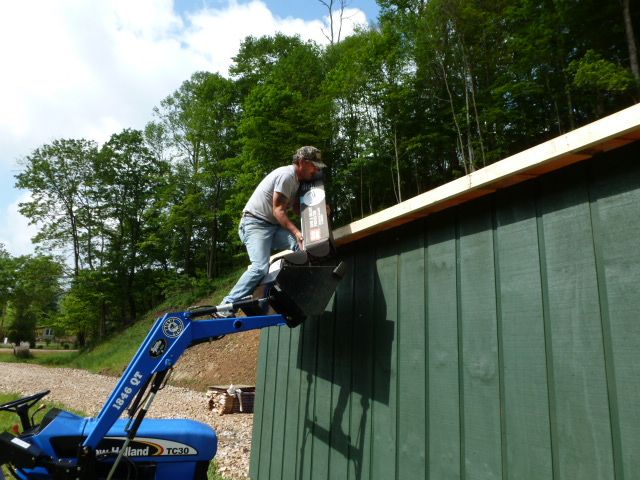
These boxes are really heavy so I help Mike load a couple of boxes onto the tractor to help us get them on the roof:


Mike getting the boxes onto the roof:


OK...back to work.  Now that the first row is done and more sheets of plywood have been thrown on the roof I can help Mike.  We are ready to go:


After we use the clips to attach the sheet to the one below it, Mike nails it to the truss:


We are trying to beat any bad weather so we move as fast as we can.  It's a system.  We throw the plywood on top of the roof, get the clips on and nail the plywood sheets to the trusses.  We are almost done with the full sheets of plywood:


It's starting to close up from the inside of the building.  The quicker we can close it in the drier it will stay:


Now that all of the full sheets of plywood are up we have to measure and cut the strips to install them.  Thankfully the strips are much lighter than the full sheets.  We get them cut and thrown up on the roof.  Mike gets the first one in place to nail it down:


The clouds are coming in and we need to get this roof protected.  The plywood is done:


Next Mike installs the drip edge.  The drip edge is a metal piece that goes over the edge of the roof and off the end of the roof.  It is used to divert water and protect the walls of the building form the water coming off the roof:


While Mike does that I get the roof ready for the Grip rite Protector.  I use the blower to clean off any extra debris on the roof:


Now it's time to get the protection on the plywood.  The Grip Rite comes in heavy rolls that stick to the plywood.  Mike and I roll out about 12 feet at a time, cut it off, put it in place and peel back the backing so we can stick it to the roof.  The first section is down and Mike cuts the next one:


The front side of the roof is done and now completely protected from any bad weather:


Today was our messiest day on the job.  Mike and I like to clean as we go but today it was more important to close up before the rain:


I am sticking down one of the last pieces of Grip Rite:


Most people don't use Grip Rite on the whole roof but because of all of the rain we have been having Mike and I wanted the extra security in keeping the plywood on the roof dry and protected.


After a very long day we are still not done.  The last thing we have to do is get the 24 bundles of shingles on top of the roof.  Since the bundles each weigh about 75 pounds Mike and I work together by opening the pack and placing the shingles into the tractor bucket.  While Mike unloads them onto the roof I will spread them around to get ready for the install.

Mike pulling the shingles off the tractor:


After Mike unloads the tractor bucket I get all the shingles spread out across the roof:

It was an exhausting day and we kicked butt:) and we got it done and just in time.  The rain started as we were cleaning up the garbage.

Now we have to wait for another dry day to get the shingles done.

We are just happy that the store is closed up and protected.  Now it will stay dry.

I hope you all enjoyed this story.  Have a great week and I will write again soon:)

Monday, May 27, 2013

Chapter 152...The Trusses Are Here


Today is the delivery day for our trusses.  We have no idea what time the trusses will arrive but we have been told that the driver has our phone number.  Mike and I decided to take a ride over to our old roller skating rink which is now an antiques store to kill some time.  Sure enough as soon as we get out to the car the driver calls us.  Good timing.  Unfortunately when we pass him he is in our home driveway and not at the store.  We tell him to back out and follow us to the store.


All 25 trusses being dropped.


Oops...it looks like they are going to tip over.  


After they are on the ground, Mike and I cut the straps and bring them inside the building.  We have to go back to the house and get the tools we need to start working.  In the meantime we don't want to leave the trusses outside.


Now you will see why Mike and I only went 15 feet wide with this building.  The trusses are 16.4 feet long.  In doing this Mike and I can handle doing this ourselves.  You all know we hate when we have to deal with "other" people on our worksites, lol.


With two ladders ready to go I help Mike get the first end truss up.  We line it up with the edge of the building and Mike starts nailing:


We work together getting each truss on top of the building.  Then we stand them using the lines we made the other day for the correct placement.  I hold the truss in place while Mike continues to nail.  Once we have a few trusses up Mike nails in a 2x4 to help stabilize the truss.  We call these 2x4's rat runs.


Mike nailing in another rat run to the top portion of the trusses:


You can see we have 2x4 rat runs running along the bottom of the trusses and also underneath the top of the trusses.  We will do this for the entire length of the building and they will be a permanent part of the building:


Almost half way done:


Since we got a late start today we only got about 3/4's finished but Mike did call in an order for the plywood for the roof:)


The next day we go back with our tools and get set up:


We are working our way to the other end of the building.  It's going to get tight here so we decide to put all the trusses up top and slide them one by one into place.  The trusses are top heavy and always make me nervous when they swing down.  I tend to fight the natural momentum of them and Mike tells me all the time to relax, lol.

The rest of the trusses are up and hanging upside down:


Mike stays on one ladder on one side while I am on the other ladder on the other side.  One by one we flip the truss up into place and Mike starts nailing.  Here I am getting ready to flip a truss:


Getting down the to the last of the rat runs:


All of the trusses are up.  That wasn't too bad.  If you keep your store/home narrow and have a low pitch it is much easier to install yourself.  The bigger you make things the more you need help and we Mike and I don't like help, lol.


Mike cuts off the extra rat runs that don't reach another truss:


Our next delivery.  We got plywood for the roof, clips to hold the plywood together and trim boards for the outside of the store:


Mike and I measure the board to be cut.  These boards cover the outside of the truss and will run the whole perimeter of the building.  This is called fascia board.
 

Mike nails one in place:


The front fascia boards are up:


After that we carry all of the plywood and the other boards inside the building.  Since concrete floors are always damp we lay out some junk wood to protect the good wood.  We don't want to lay the good wood right on the concrete floor.  It will warp.  Next we have to cover everything up because the rain is coming...again!!


Ready for the rain:


That's all for this story.  We did pretty good getting the trusses up and now we are ready to start the roof.  Our next story will be about getting the plywood on top of the trusses...ugh!! and getting the roof started.

I hope you enjoyed this story and I will write again soon.


Saturday, May 25, 2013

Chapter 151...Painting The Store And Getting Ready For The Trusses


Mike and I almost have the store walls up.  All we have left today is getting the front door on and adding the remainder of the siding:


Mike putting in the header for the door:


And nailing in the siding along the side of the door:


The store walls and doors are done:


And:


Now we are ready for the trusses.  Mike calls the truss company to see when they will be delivering and it is not for a few more days.  Since Mike and I don't like to waste time and wait for people we decide to paint the store even though it is not the normal order of things, lol.  Why wait around when you can accomplish something:)


We get everything ready for painting and pack up the trailer.  The first thing I do is sweep the T1-11(siding).  There is a lot of saw dust and small wood particles on this wood.  If you don't sweep it off it will come off after the paint is on and take some of the paint with it.  We don't want that.


Since we don't have water at the site yet we decide to use the small spray gun for painting.  It is less messy and much easier to clean even though it will take longer.  Mike starts spraying what he can without my help.  I need to move along with him and hold the cardboard at the top and also the bottom of the building so we don't make a green mess everywhere.  Mike spraying:


As a lot of you know Mike and I are terrible at picking paint colors.  For us it is much easier to go with what we know and what we like.  The color of the building is the same as our house.  It will also blend in nicely with the surroundings:)


Almost done with one long side:


While Mike does the spraying I start cutting paint in around the door.  T1-11 is terrible on a paint brush.  It takes forever to fill in the rough cut wood:


We went through one five gallon bucket of paint and we only got the front done, the two sides done and part of the back.  It's looking good but funny to see a building shell painted and no roof, lol.  Yeah...that sounds like Mike and I.  Get 'R Done!!!


While I was cutting in the doors, Mike sprayed out the remainder of the paint on the back wall:


The next day is raining so we go to town to pick up more paint.


The next nice day we are ready to go:)  Mike goes back to spraying the back of the building:


Almsot done.  Now I hope that the first batch of paint and this one blend in:

The first coat is on and the building is now protected from the bad weather.  Once we get the whole building enclosed Mike and I will paint a second coat on the whole building using the roller.


We heard back from the truss company and we are scheduled for delivery...yes!!!!  We have a few things left to do before the trusses get there that will make our lives easier once the trusses arrive.  So back to the store and Mike caulks the door frames in:


This is the part that will make our lives easier.  The trusses will sit on the front and back wall every two feet.  Since we have the time we decide to measure and mark off the 2 foot sections before the trusses get here.  This will save us so much time.


Mike started at one end and I held the tape ruler at the other end.  Mike moves along the wall and marks off the 2 foot on center.  Then he draws two lines to show where the truss will sit.  Our marks on the top of the wall:


Mike uses the ruler to measure the location for each truss and then draws the lines using a speed square:


Mike working his way to me:


We got the tops of the walls measured and we are almost ready to go.  The last thing we have to do is put up some temporary 2x4's to keep the first end truss from falling off the walls.


Mike screwing in the first temporary 2x4:


The 2x4's up and we are now ready for the trusses:


That's all for today.  I hope you all enjoyed this story and the next one you will get to see how Mike and I get the trusses on the store.

Have a great weekend:)