Showing posts with label Eaves. Show all posts

Tuesday, July 9, 2013

Chapter 161...Vents, Plumbing And Building Shelves


This week's pictures is a lot of odds and ends.  We have to wrap up some old stuff, get ready for the sheetrock to be installed, and start building shelves for the store.


Here is Mike on the back side of the building using a template for one of the vents:


One vent is installed.  We will have two on each end.  We tried to use some vents that we had in our storage container but Mike isn't happy with it.  We will have to look for more vents when we go to town:


That's OK....there is always something else to do.  Mike starts working on the plumbing inside the building.  He starts with the cold water pex lines:


Using the crimping tool.  I love this stuff:


The cold water (blue) lines are in.  Now Mike works on the hot water lines.  Gotta love pex.  It is so easy to work with:


And the plumbing is done.  Nice and easy:


Everything is cleared out and cleaned up.  We are ready for the sheetrock delivery:


The sheetrock is delivered.  Since a crew will be doing the work we were able to order 12 foot boards.  That's a lot of sheetrock:


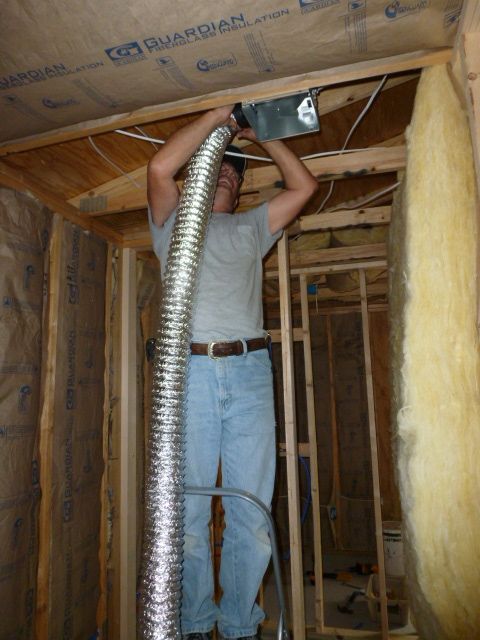
Next Mike works on the fan/light combo for the bathroom:


Wiring it:


Putting it in place:


And adding the hose which will vent it outside the building:


Back to the vents.  Mike cutting out the siding for the second vent:


Using the reciprocating saw to cut another square for the vent:


Adding screen behind the vent so no animals can squeeze in:


Adding the green painted vent.  Much better:):


Working on the last vent:


Yay...we are done:


Hanging the last of the eaves that we have:


The building is now cleared out for the sheetrock crew.  We will start building the shelves at the house so we aren't in the way.  We are going to build the same type of shelves that we built last year for our shed.


I measure all of the 2x4's while Mike cuts them down:


Next we start building the bases for each shelf.  First we make a box using the 2x4's and nail them together:


Then we put the measured and cut down pice of plywood on top of the box:


That gets nailed down to the 2x4's:


Making another box.  We need three boxes for each shelf:


We are out of wood so we stack them on the shed until we can paint them:


Ahh...the next day is painting day:  We lay a couple of boxes at a time across the saw horses so we can give them the first coat of paint:


Mike starts spraying:


We got the bottoms all done.  Now we wait for them to dry:


Once those are dry we flip them over and paint the tops:


Niki supervises the drying:


That's all we did for now.  Once they are dry we stack them back in the building.  The next job we have will be making the stands for the shelves....but that's another story.

I hope you enjoyed this story and I will write again soon.

Monday, June 24, 2013

Chapter 159...Eaves, Electrical And Building Interior Walls

Hello everyone.  Today's chapter is about getting the eaves cut, painted and installed, working on the electrical wiring inside the store, and building the walls for the bathroom and utility room.

So let's get to work:)


We are using the extra T1-11 for the eaves.  The eaves are the lower edge of the roof.  We use the saw horses to measure and cut the boards.

Mike is measuring:


After we get some of the eaves cut I get them painted:


I ran out of room on the saw horses so I set up some cross boards and started painting the eaves inside the building:


Mike starts working on the electric inside the store.  He is nailing in the electric outlet boxes every eight feet:


Once the boxes are in he starts the wiring:


Drilling a hole in the top of the wall so we can feed the electric wire above the trusses and over to the electrical panel box:


Mike pulling the wires over to the utility closet:


Drilling holes into the sides of the walls to make room for the wires.  Every stud needs a hole drilled:


More boxes being nailed in:


Feeding the electric wire into the circuit breaker box:


Mike wires the outlets for our overhead lights:


I nail in metal plate covers on every stud to protect the electric wire.  This needs to be done so that no nails or screws go through the electric wire when the sheetrock is installed:


Yay...another delivery.  My insulation is here....my favorite job:).  We also go some more 2x4's for the interior walls:


We empty the building and then we refill it, lol:


We alos have to make shelves for the store.  We will be making them out of plywood.  Mike measures for each shelf:


Cutting them down to size for 16 inch shelves:


Bringing them inside and stacking them until we are ready to paint and build them:


Here are our stacks of shelves and eaves that we will get back to.  Right now Mike needs my help building the walls for the bathroom and the utility closet:


Mike measures the 2x4's for the top plate for the wall:


Once the 2x4's are cut down we lay them out and get ready to nail them together.  We use pressure treated 2x4's for the bottom plate which will sit on the concrete floor and regular 2x4's for the rest of the wall.


Once we get a section of wall done, we stand it up and anchor it into the ground:


Mike trying to get our section straight:


Nailing the section of interior wall to the inside of the truss:


We have rooms:)  The bathroom and the utility room studs are up:


Now it's time to install the eaves that have already been painted and are dry.  Mike nails the first one in place on the back of the building:


Moving along:


And we are done:


That's all for now.  Mike and I are happy with the progress.  Next time I will tell you about my insulation job and Mike will finish up the electrical wiring and do the plumbing.

I hope you enjoyed the story and have a great week:)