Pages

Thursday, July 31, 2014

Nicole's Kitchen Remodel…Part 3

I'm sorry I am so late.  Mike and I just got back from moving out of Florida.  Now it's time for the third installment of Nicole's kitchen remodel.


While we wait for the countertops we continue with the rest of the cabinets.  On this Sunday morning, Mike and I load up our tools and head over to Nicole's to help her with the upper cabinets on the side by her sink and stove.

We are doing this project in small sections so Nicole and her family can keep using the kitchen.

Thankfully Nicole is ready for us.  She has emptied all the upper cabinets, taken the doors off and moved the range out of the way:


Nicole tried to get this upper cabinet off the wall but the screw was too hard to reach.  Mike tries with this set up, lol:


We soon find out that we will not be able to unscrew the cabinets from the walls.  Nicole tries to rock it off:


Time for Nicole to get out of the way…Mike has the hammer, lol:


And a crow bar:


Yay...it's coming apart.   Now we can reach the screws.  As you can see these are not real cabinets.  These were built in place:


One wall is done.  On to the next wall:


Using the handy cut off wheel to cut some screws:


One of the kids must have grabbed the camera.  Nicole and I need to stop matching, lol:


Nicole and I hold the cabinet up while Mike screws it into the wall:


Time for the corner cabinet:


The corner cabinet is up.  Next up is the cabinet for over the stove.  Hmm…Mike contemplates the range hood and the venting duct.  Holes will need to be cut:


Once Mike figures out the placement for the vent he uses a drill to cut the holes:


He tapes off the cabinet and uses the jigsaw to cut the rectangle out of the bottom of the cabinet for the range hood:


Crimping the vent pipe so it will fit into the pipe that goes through the roof:


Nicole and I assist Mike while he cuts the hole in the top of the cabinet for the vent pipe:


I hold up the range hood while Mike connects the electric wires:


Making sure the pipe will fit into our hole:


Finishing up the range hood hook up:


I know…that looked so easy right, lol?  That took is much longer than expected to figure out the measurements and the cutting of all the holes.

 Mike screws the face frames together on the corner cabinet and the one to the right:


The face frames are clamped together and Mike screws the next pair together:


We tried to hang the last cabinet which is to the left of the stove.  Unfortunately there are no studs in that wall.  We will have to wait until next time and use some anchor bolts.

Nicole installs the new cabinet doors:


Time for the Island.  We took the old cabinets out and put the new ones in place.  Next we added the butcher block and screwed that down:


Nicole measures and cuts the stained board that goes on the back of the island cabinets:


Mike checks the fit:


And uses finish nailers to nail it on:


Nicole holds the corner mold in place for Mike to nail:


The uppers minus one are done:


The one that is by itself:


That is all for now.  The remodel is going well.  Nicole has been doing a lot of the prep work which is keeping the time for the job for Mike and I to a minimum.  The first two times went very quickly.  Today's work lasted a bit longer.


Next up….the lower cabinets and the counter top.


Have a great rest of the week and I will post again on Monday.

Monday, July 21, 2014

Nicole's Kitchen Remodel…Part 2

Welcome to part two of Nicole's kitchen remodel.  Mike and I are helping her with the some of the demo, install, and plumbing.  Nicole will be putting her cabinets together and also adding all the finishing touches.


She is very excited about this project and she has e-mailed me pictures of her progress.  We got the boxes for 18 cabinets on a Thursday.  Nicole kept me informed.  Thursday she got the first one finished and she said the instructions were horrible.  She went online and watched a video on how to assemble them.  After that she said it was pretty easy.


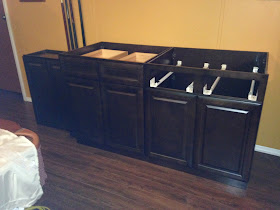
 By Friday she had 3 done and by Saturday she had 10 finished.  Here is what they look like:


Mike and I told her we would be there on Sunday to help with the first side of the kitchen.  We loaded up the Jeep and headed over to her house:


When we got there Nicole had a plate of homemade waffles for breakfast.  Yum…now we are ready to work.

Nicole did great on getting the lower cabinets and the old countertop out.  So we are starting with a clean slate today.  Just an install:)


Mike is checking for studs in the walls:


While Mike does that, Nicole takes the doors back off.  It is easier to install the cabinets without the doors on the cabinets. They are lighter and we will need them off to screw the face frames of the cabinets together.

Two uppers are up:


After we make sure the face frames are flush, Mike clamps them together:


Mike drills a pilot hole and then the screw:


Mike working on another upper cabinet while Nicole helps, lol:


The uppers on that side are finished:


Just checking the doors and the hinges.  Quite a few of the doors were out of whack and needed to be adjusted.  Sadly these cabinets don't have easy adjustments.  Her cabinets have overlay doors and they are a pain to get to look good.  The doors also tend to hit things like walls and appliances when you open them because there is no space between the doors.  It's something to consider when you buy cabinets:


We got the lower cabinets in place.  Mike and Nicole working on the face frames:


Screwing the face frames together:


Ah…the first of the issues.  The wall behind the lower cabinet s badly bowed.  Mike adds some shims and screws it into the wall:


Adding a shim to the draw slide that won't slide:


Ta da…day one and only a few hours later and we have one side of the kitchen cabinets finished.  Ooh…very nice:)


Mike and I will go over to Nicole's each weekend until all the cabinets and the countertop is installed.  After that, Nicole will add the backsplash and her knobs and handles.

As long as Nicole has a functioning kitchen she is happy.

That's all for now…see you next week with another update:)

Tuesday, July 15, 2014

Nicole's Kitchen Remodel…Part 1

Mike's daughter, Nicole, has been wanting to remodel her kitchen for about 2-3 years now.  She has already done some changes like adding a tile countertop on top of the old laminate, new appliances, and  new sink.

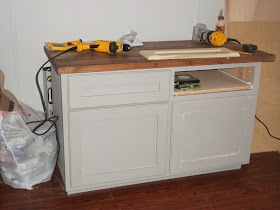
This year she decided she wanted new cabinets and a new countertop.  While trying to keep the cost down, Nicole experimented with a couple of things this year.  First she tried building her own cabinets to see if that was worthwhile.  She made a work cabinet for her workshop but found it too difficult to get the right kind of wood here.

Here is the cabinet she made.  Yes she is pretty handy.  Wonder who she takes after:)


Next she tried painting her original cabinets.  She painted a couple and it did not look good at all.

At that point Mike and I told her we would help her with the remodel if she ordered something she liked.  Well Nicole was all about that and now we are in the process of helping her.


This is Nicole's kitchen before:


She found a company online to order her cabinets from.  They sent her a sample of the door with her color and style before she placed her whole order.  This is her sample door…nice:)


Next up, Nicole took all of her kitchen measurements and placed the order.  


On July 2 we went to the store to wait for the delivery of Nicole's 18 cabinets.  Unfortunately the freight truck broke down and never made it to the store.  So we went there the next day and the truck made it:)


We got it all unloaded and loaded on to our trailer.  Unloading at Nicole's house with AJ's help:


Nicole has been preparing for this and has been taking her old cabinet doors off and emptying as many things as she can.


While we are there Mike decides to get the top cabinet down next to her refrigerator:


Since this is a doublewide, we have no idea what issues we may run into.  Nicole and I hold the cabinet box up while Mike unscrews:


Whew…that went well.  Nicole and I carry it out in one piece.


One part is down and that was an easy one.  Let's hope the rest of the kitchen goes as well:)


and we leave Nicole with her work.  She has 18 cabinets to start putting together:


Oh fun:


Mike and I have done a lot of remodels together but this one is slightly different.  One it is a doublewide and who knows how it was put together and two we are not demolishing any walls so we have to be careful.


We told Nicole that with her help the kitchen demo and remodel part will take 3-5 days.  I told her to get some paper plates and to set up a temp kitchen.  She said she won't need that because it will only take one day.  Then I told her…I don't want her to kill her father, lol.  Usually we demo an entire kitchen and then put it back together.  With no problems this would take Mike and I about 3-4 days.  We will see how long it takes in the following stories.


I will write again next week with our first real work day:)